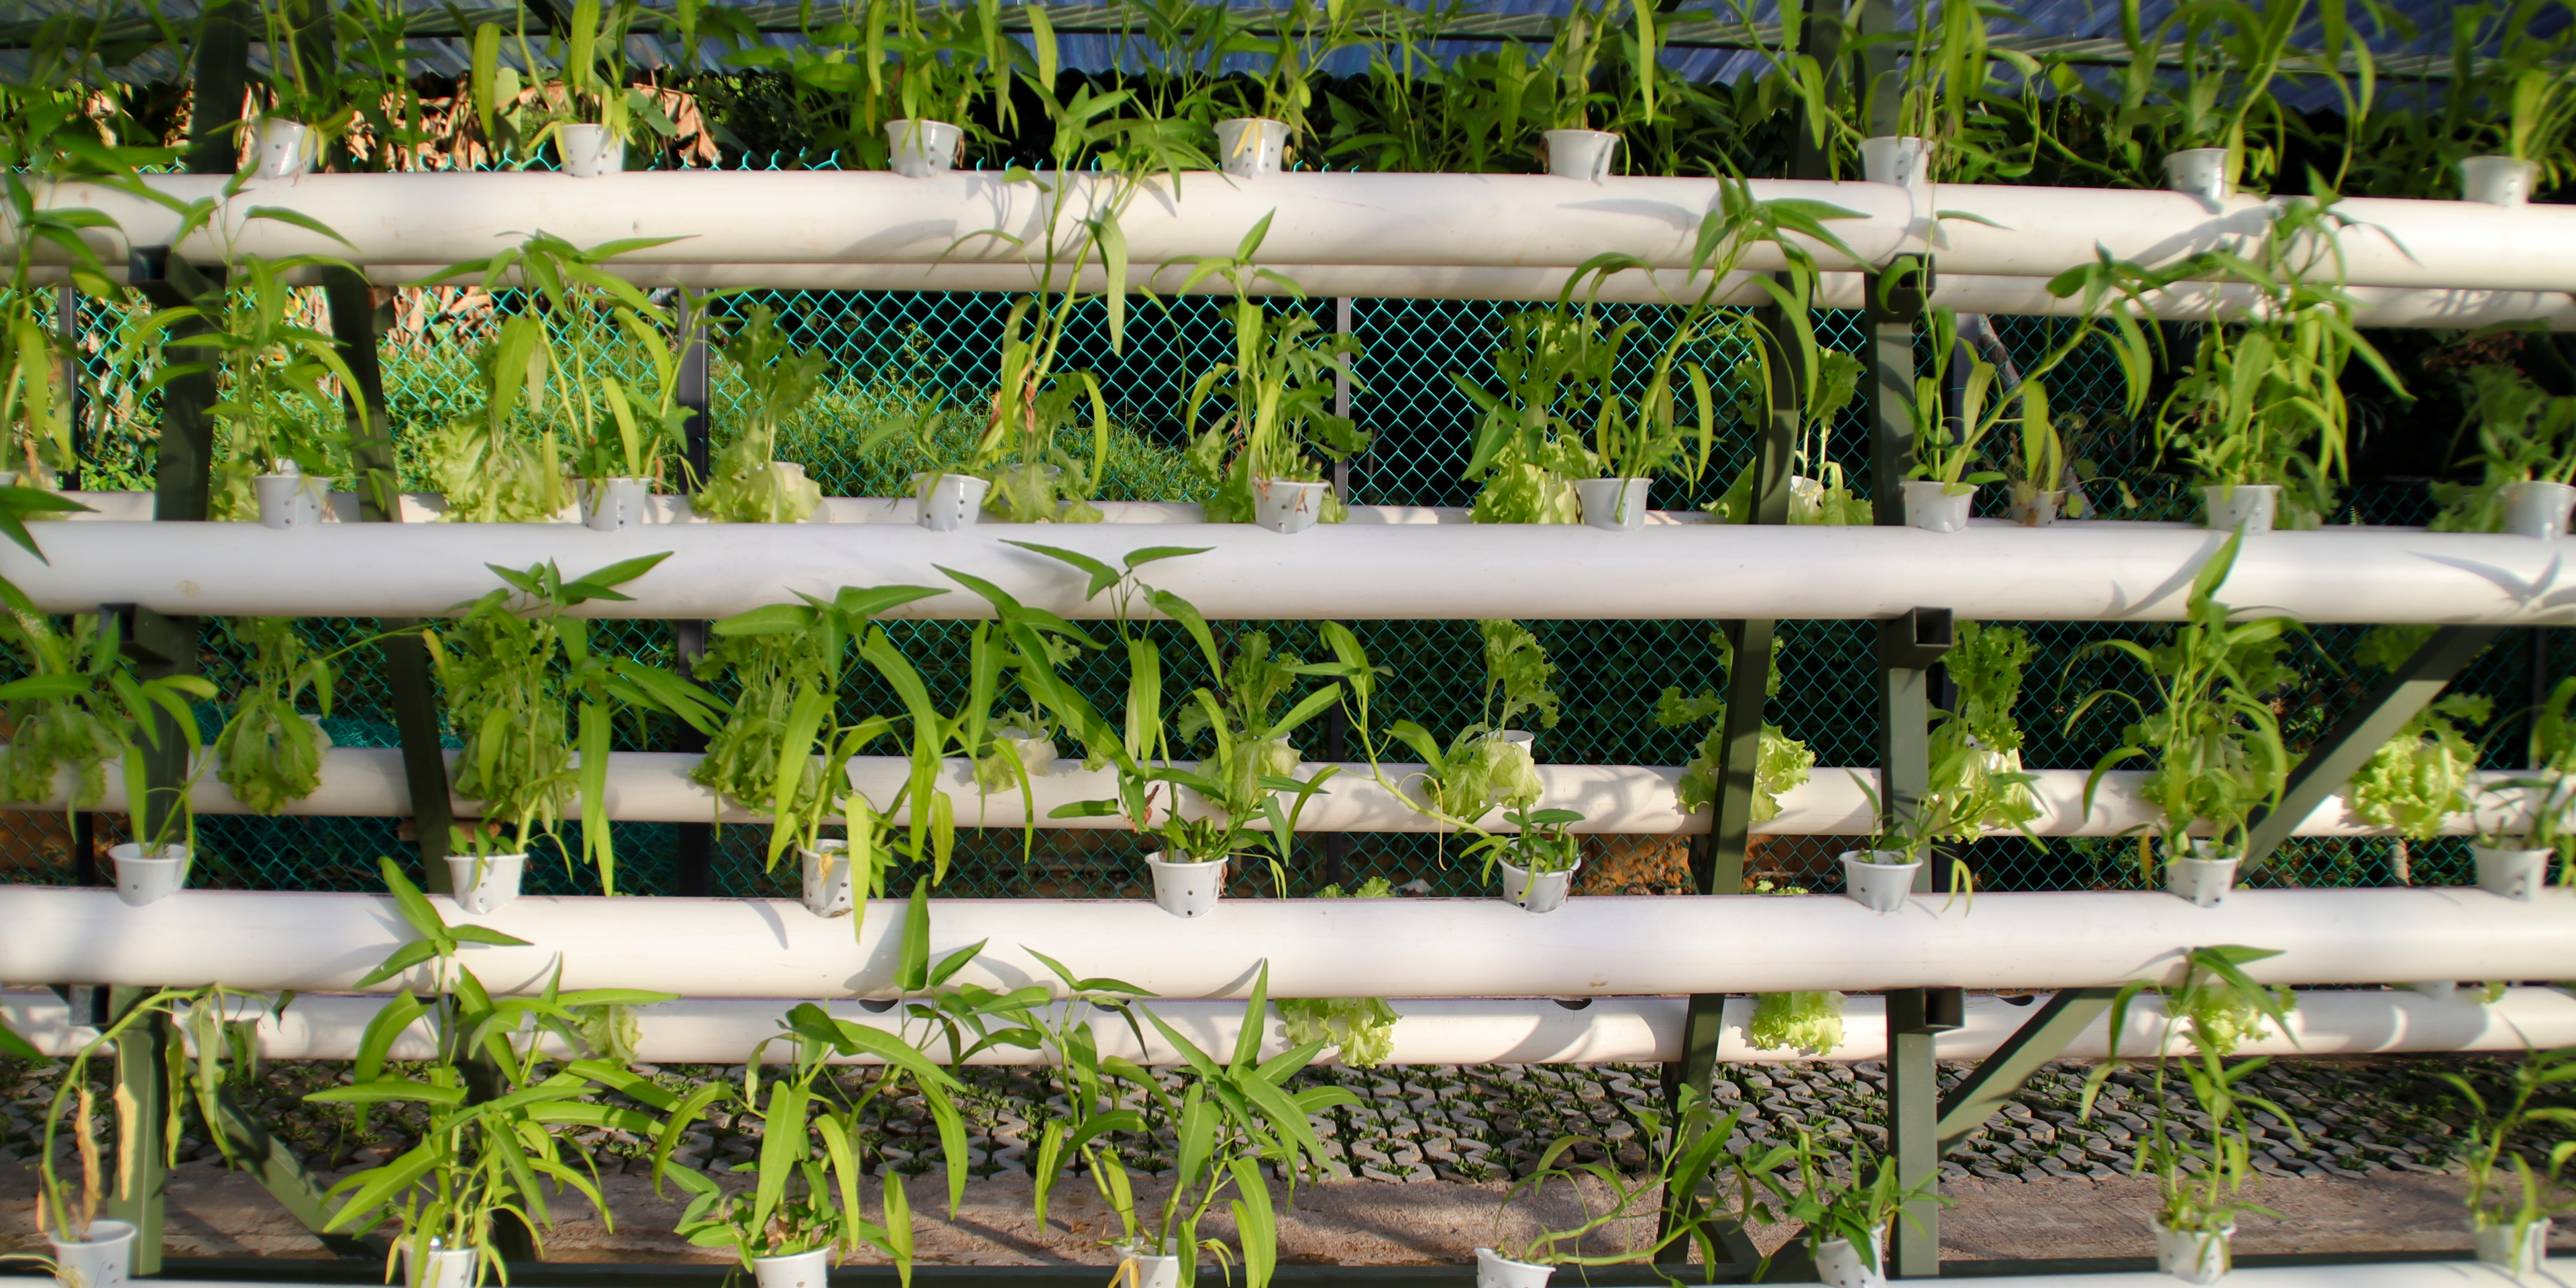
Build your own hydroponics: step-by-step instructions for your home

18.03.2024 - pia from greeny+

Do you want to build your own hydroponic system and are looking for an easy way to get started? In this article, you will find detailed instructions that will allow you to do just that. From choosing materials and tools to setting up and maintenance tips - let's take your green thumb skills to the next level!

Before you get started, we recommend that you take a look at our relevant blog posts on hydroponics and hydroponic systems .

  • The essentials in brief:

    • A simple DIY project is the wick system, it is easy to implement at home because it is passive and does not require any electrical components - the roots are continuously supplied with water and nutrients via a wick.

    • For example, to build a hydroponic system you will need PVC pipes, connectors, glue, a container for the nutrient solution, tools such as a drill and a water pump, as well as net pots and nutrient solution for the plants.

    • Monitor pH and nutrient solution, clean the system regularly and follow the tips for successful hydroponics.

Introduction to hydroponic systems

In the world of hydroponics, there are various systems, each suitable for different requirements and types of plants . A distinction is made between passive and active hydroponic systems.

  • Passive systems do not require any electrical components . Thanks to their independence from a power source, they can be used extremely flexibly, which can be a great advantage in various scenarios.

  • Active systems are more complex in structure and require electricity , but are also much more effective.

A simple alternative for a passive DIY hydroponic system for home use is the wick system . In this method, plants are wrapped in a growing medium such as coco coir or perlite, which is placed in a container of water and nutrient solution.

A wick or capillary carries the nutrient solution from the reservoir to the roots of the plants, providing them with a continuous supply of water and nutrients.
This system requires few materials, is independent of electricity, and is easy to build and maintain.

We will discuss building a NFT (nutrient film technique) system below, as it offers an efficient way to grow plants without soil substrate by cultivating them in a shallow channel system with a continuous supply of nutrient solution. This hydroponic method is ideal for growing herbs, lettuces and other plants at home, especially in environments with limited space.

What materials and tools do I need?

PVC pipes (diameter as required)

If you can buy white pipes, you should do so, otherwise we recommend painting them white as this will help keep the water cool.

Many pipes are black, which can accelerate the heating of all the roots and could ultimately damage them!

PVC fasteners

For example: angles, T-pieces, end caps and fasteners

PVC adhesive

Usually takes about 24 hours to dry.

Make sure the glue is waterproof and suitable for drinking water. Even if your nutrient solution is not used as drinking water, it is important to remember that you will be eating your crop at the end.

Nutrient container or reservoir

Choose a suitable container for your hydroponic system. This can be a plastic container, an aquarium or a bucket, for example, depending on the size and type of your project.

Use a container that blocks out light to prevent algae growth.

water pump

To circulate the nutrient solution in the system.

Hole drill and drilling machine

To drill holes in the PVC pipes for the net pots and hose connections.

Water hoses

For water flow and connections in the system.

A wooden frame, grid or similar

As a basic structure and support for the system.

Net pots or bowls

When choosing, pay attention to the diameter of your PVC pipe - there must be enough space for root development between the plant container and the PVC pipe.

Growing medium and planting clay

Make sure you have a suitable growing medium that supports the plant roots and retains moisture.

Common options are perlite, vermiculite, coconut fibers or specially developed hydroponic substrates - you add these to the plant container (e.g. net pot)

Nutrient solution

The nutrient solution is the heart of a hydroponic system. Make sure your plants get all the nutrients they need. You can buy ready-made nutrient solutions or make your own mix.

  • If necessary, add:

    • pH and EC meters:
      To ensure that your nutrient solution has the correct composition, you will need pH and EC meters to monitor pH and electrolyte conductivity.

    • Lighting:
      For indoor hydroponic growing, you may need additional lighting, especially if you are working in a room with little natural light.

    • Timer:
      To switch the pump on and off at specific intervals and thus ensure correct timing for the system, a timer does the work for you.

Build your own hydroponics: step-by-step instructions

1. Consider how big your NFT system should be and how many plants you want to grow in it.

2. Determine the location for the system, ideally prefer a bright location with plenty of natural light – or supplement your system with artificial light.

3. Think about how you want to make your system stable, for example, use a grid or a wooden frame for the wall to which you can attach your pipes.

Objective: Create a zigzag river to have real flowing water and prevent standing water.

4. Cut the PVC pipes to the desired lengths, have them cut to size or buy them directly in the desired length.

Bohrmaschine bohrt Loch in ein PVC-Rohr

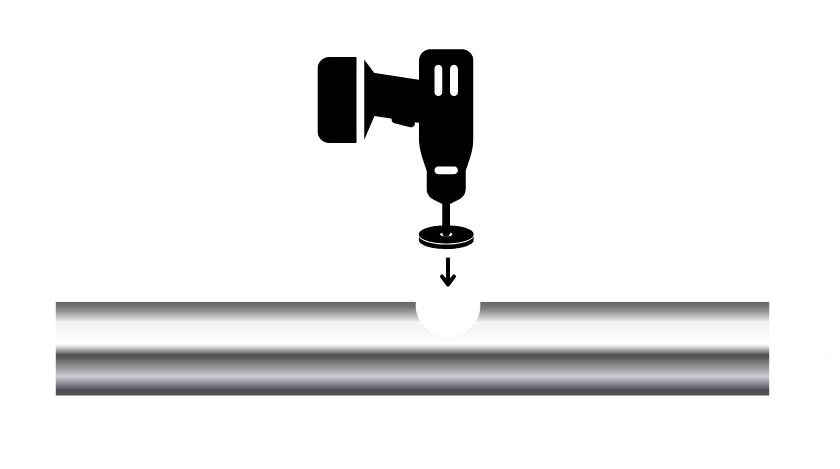
5. Drill or cut holes in the top of the PVC pipes to accommodate the net pots or plant trays.

Info: The goal should be to allow the bottom of the net pots to hang completely in the tube without leaving too much space between the bottom of the net pot and the tube. So make sure the holes are big enough to comfortably accommodate your net pots and allow the roots of the plants to hang freely in the nutrient film.

PVC-Rohr wird geklebt

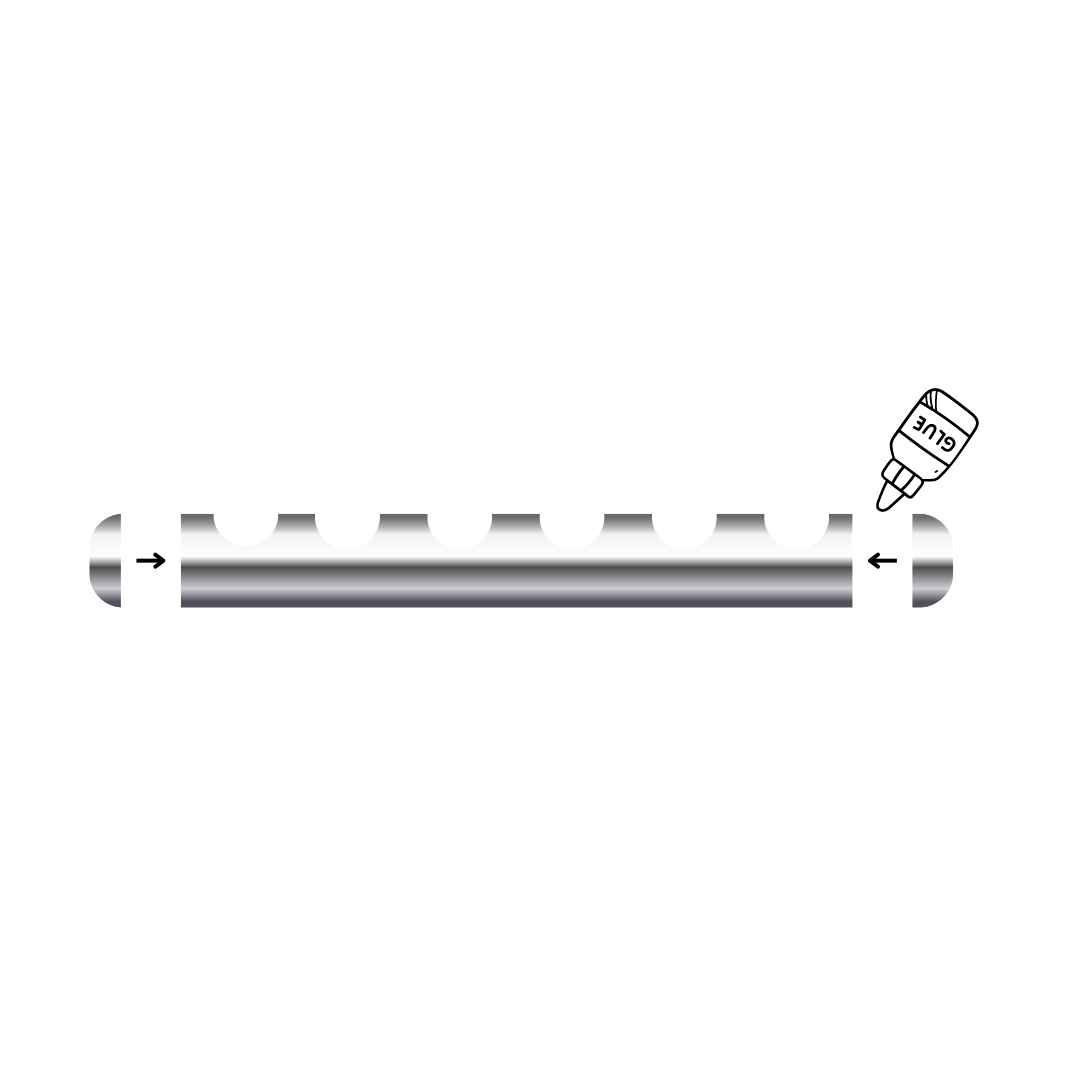
6. Seal your pipes with suitable closures and PVC glue.

Löcher werden in PVC-Rohr von oben und unten gebohrt

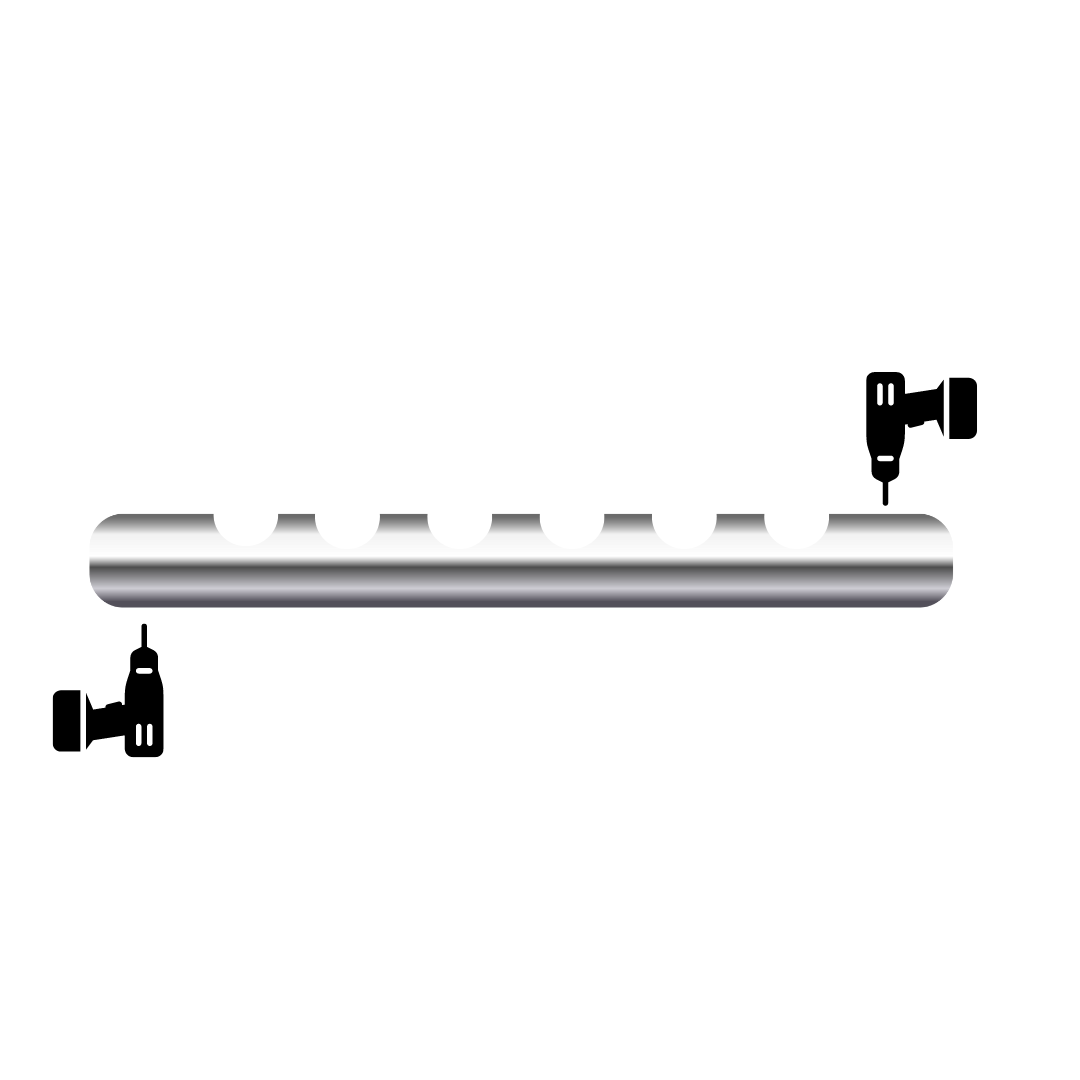
7. Drill a hole on the top of the pipe for the inlet hole where the holes for the net pots are and a hole for the outlet at the bottom.

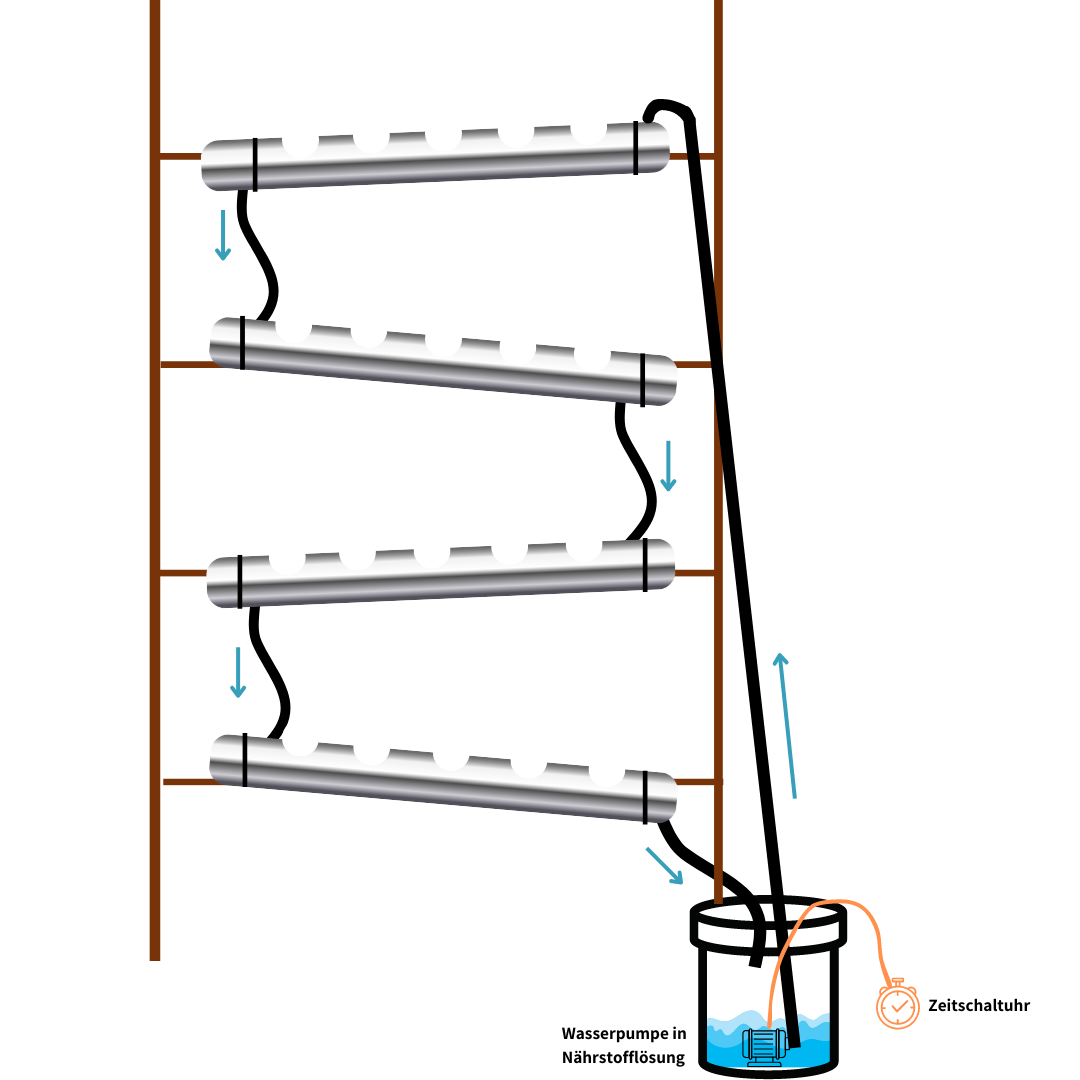
8. Attach your prefabricated channels (PVC pipes) to a wooden frame or similar.

9. Connect the pipes to the hoses and use additional gaskets if necessary.

10. Place the nutrient reservoir in a suitable location and fill it with the nutrient solution.

11. Place the pump in the reservoir and connect it to the hose of your top channel.

12. Let the tube of the last channel lead back into your reservoir.

13. Turn on the pump and monitor the flow of the nutrient film through the channels - adjust if necessary.

Tip: To make things easier for yourself, it is best to work with a timer. Use short intervals with short pumping times to prevent overflow, as the plants will form larger roots that could clog the hoses. With frequent and short-term watering, the water may still be able to flow completely through the system.

Netztopf wird bepflanzt

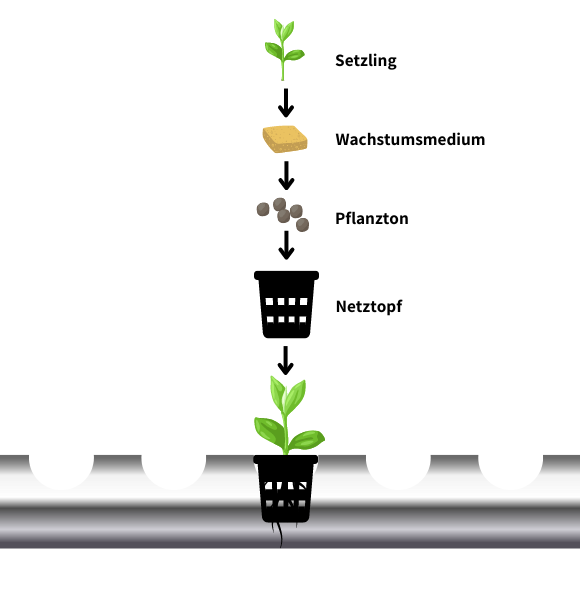
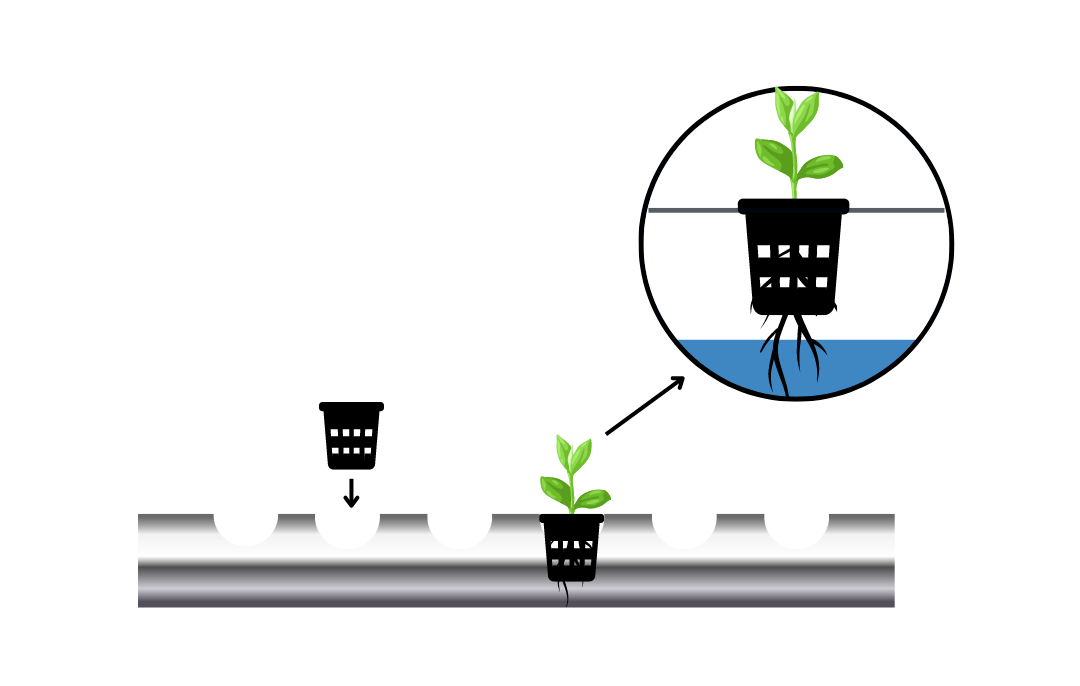
14. Plant your net pots and place them in your DIY hydroponic system.

Care and maintenance of your hydroponic system

Once your hydroponic system has been successfully set up, proper care and maintenance is crucial to achieving optimal results. Monitoring the nutrient solution in the system is made easier by special measuring devices such as an EC meter. An ideal EC value , which indicates the nutrient concentration, is on average around 1.5 mS/cm .

The pH value of the nutrient solution should be in the range of 5.5 to 6.5 to ensure healthy plant growth.

After replanting the plants, it is important to check not only the EC value but also the pH value of the nutrient solution and adjust it if necessary.

As a rule of thumb , a hydroponic system should be cleaned every four weeks to remove debris and contaminants.

Tips for successful hydroponics

  • In addition to the proper care and maintenance of your hydroponic system, there are certain tips that can help you to run a successful hydroponic system:

    • Avoid compacting the growing medium too much to ensure the roots receive enough oxygen.

    • Be experimental and try different plant varieties and growing media to find out what works best for your hydroponic system.

    • Keep your system clean to avoid buildup and pathogens.

    • Be patient and open to new ideas. Hydroponic gardening may take some time and adjustment, but with the right care, you can achieve impressive results.

    • Start with simple planting to get quick results, such as:

    - Lettuce: Particularly suitable for hydroponics and ideal for beginners as it has a shallow root system.

    - Spinach: Spinach grows quickly in hydroponic systems, especially using methods that highly oxygenate the nutrient solution.

    - Herbs: chives, dill, basil, mint, parsley & watercress

Conclusion:

With these tips and our guide, you'll be ready to start your own hydroponic adventure and harvest fresh, healthy vegetables and herbs right from your garden at home. Don't forget to regularly care for and maintain your system for optimal results .

Thanks to innovative technologies like NFT (nutrient film technology) and precise soil-free nutrient control, you can take steps to increase the efficiency of your garden and collect data on pH levels and growing conditions.

Have fun gardening and sharing your experiences with others!

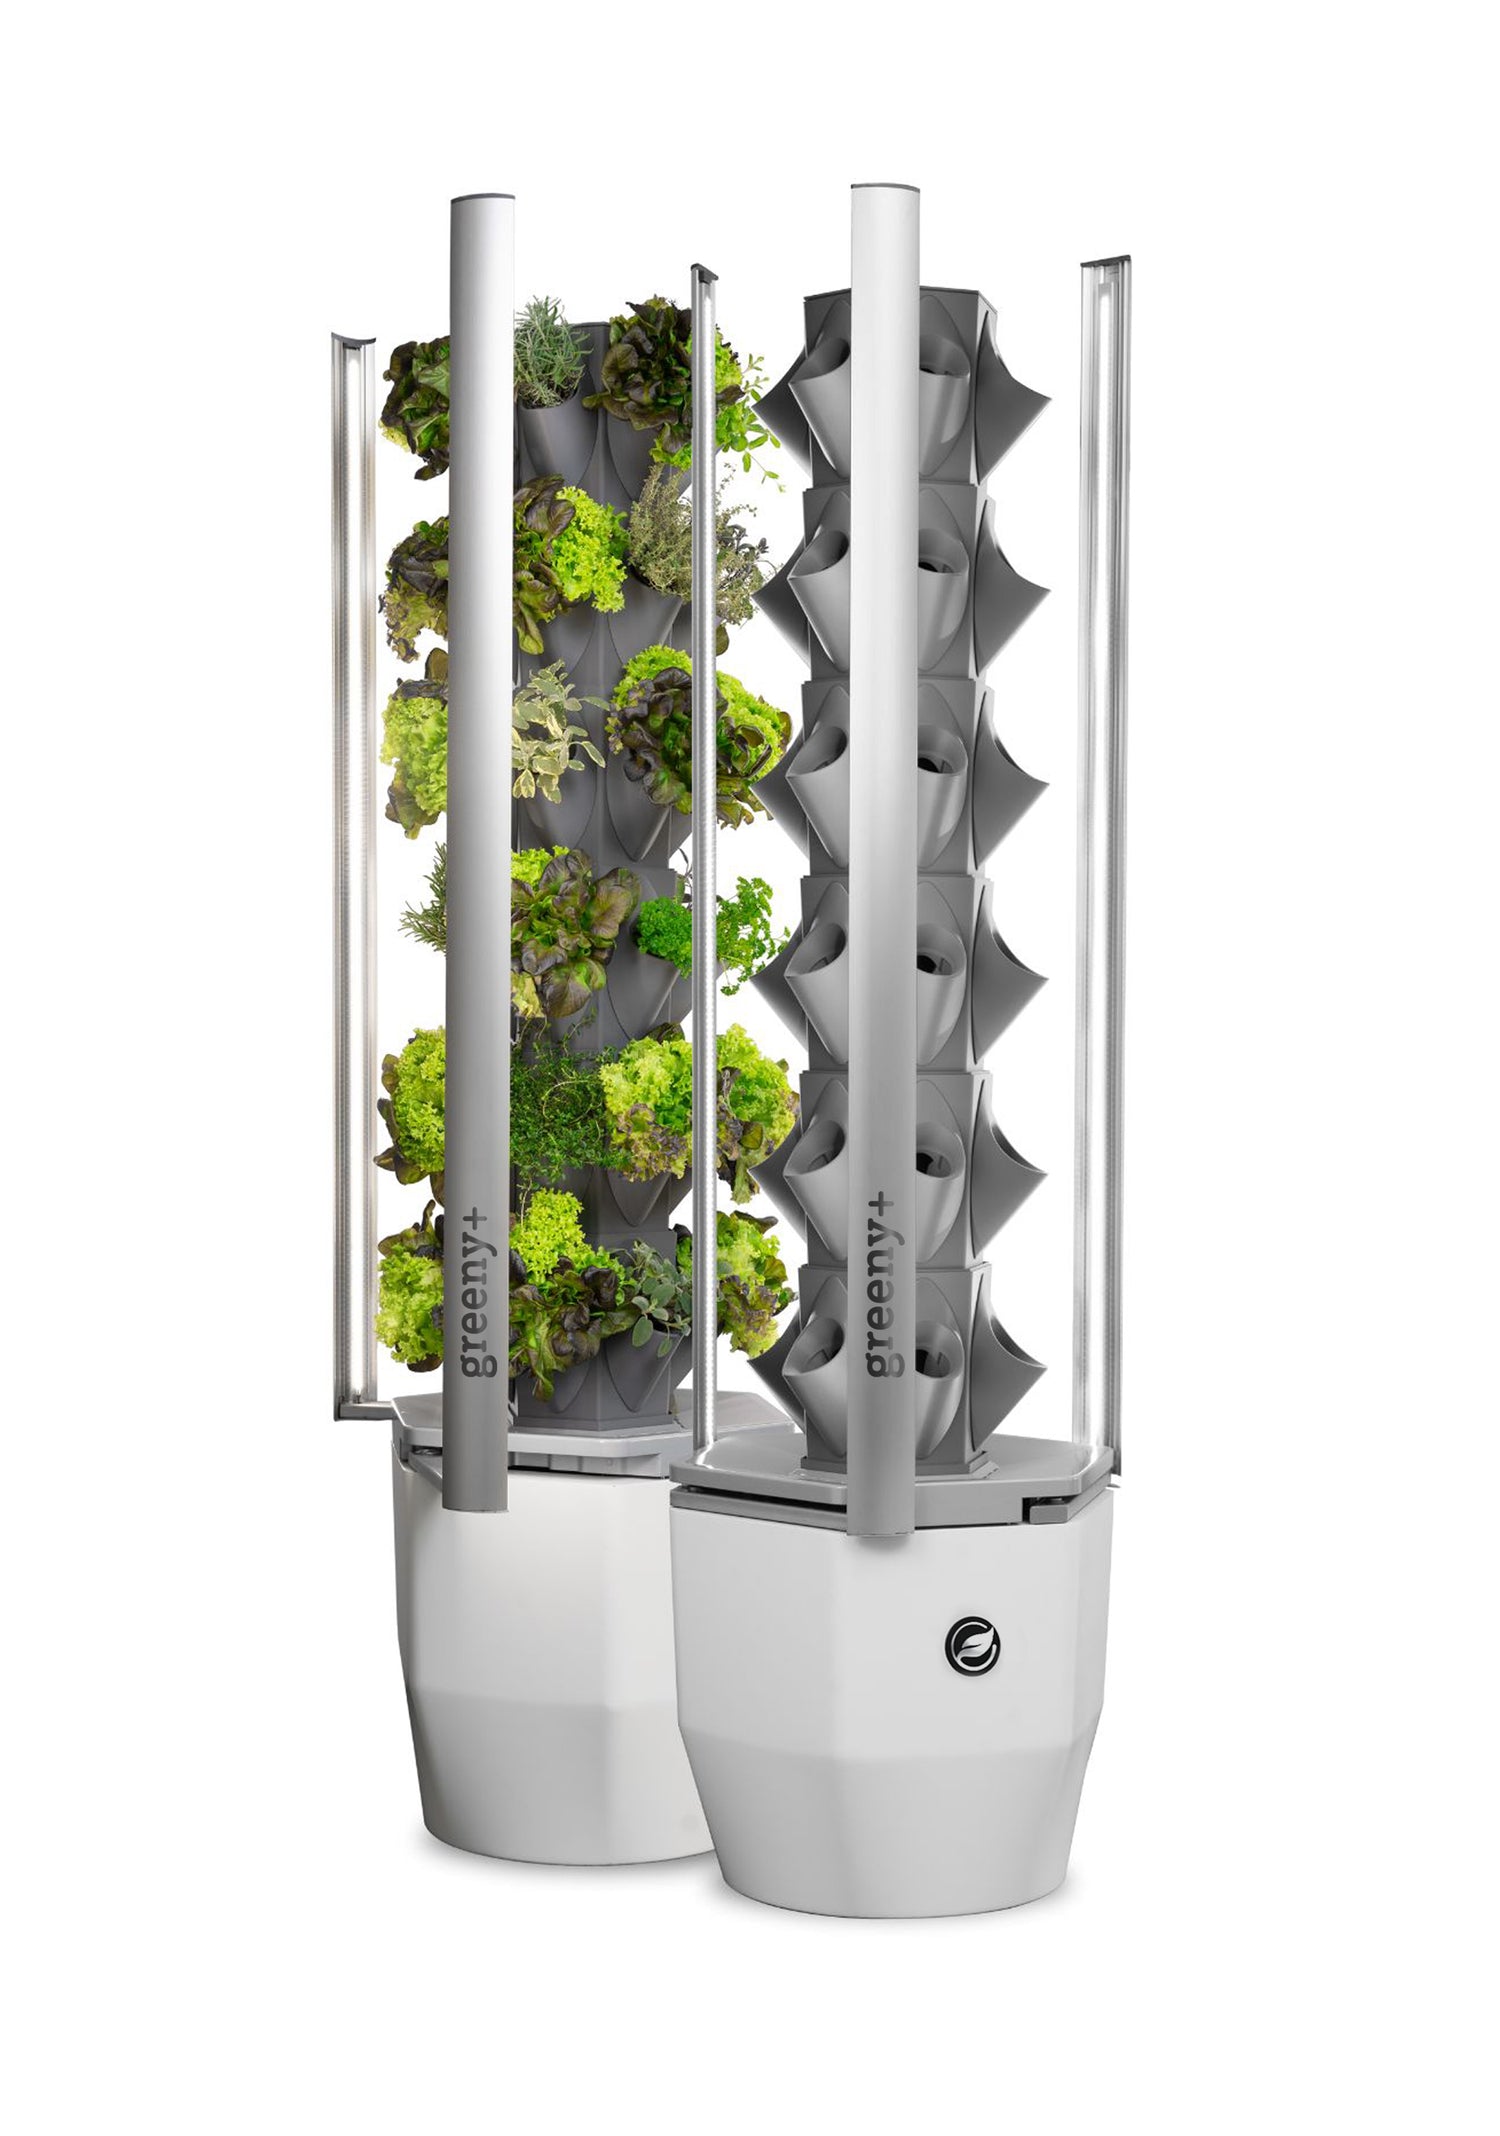
However, if after reading this article you are looking for an all-in-one solution that will make it easier for you to get started with hydroponics, the greenyGARDEN HOME is an ideal option. This prefabricated system allows you to use an efficient and user-friendly hydroponic system without much effort.